When they are working properly, the valves in an industrial fluid system may often be overlooked. Since they control and maintain optimal levels of flow, operators must be able to rely on their ability to always function. If they are not functioning properly, they can have a negative effect on system efficiency, profitability, and safety.
That is why you should always have plans in place to maintain and repair valves at regular intervals. Creating such a plan is essential, and knowing how to do it well will help keep your plant running smoothly.
Proper Installation Leads to Better Maintenance
Installation errors can lead to the poor performance of valves and other fluid system components. Careful attention should be paid to proper installation methods because they will reduce the maintenance needs and costs over the system’s life. These best practices should be prioritized when it comes to valve installations:
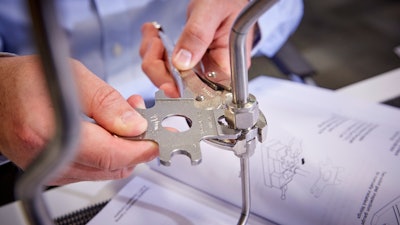
 Figure 1. Gap inspection tools should be employed to make sure fittings are tightened properly to prevent leaks.Swagelok
- All installations should begin with a thorough reading of the manufacturer’s installation manual. In addition, take advantage of any training sessions they offer to gain a better understanding of proper assembly and disassembly (Figure 1).
- Educate yourself on the specific capabilities and operating parameters involved in your valve installation.
- Think ahead and provide enough space for easy access so the valves can be maintained in the future.
- Mount valves to fixed locations to minimize vibration wear. If necessary, add enough support to tubing and piping on both sides of the valve to help (Figure 2).
- Orient the valve properly to ensure media will flow in the correct direction.
- Keep the valves contaminant-free by putting filters in the right places for your fluid system. Choosing the right filter is crucial to ensure particulates do not collect between the valve seat and stem.
 Figure 2. In situations in which vibration damage is expected, mount the valves on fixed locations that are easy to access for future maintenance.Swagelok
Create a Preventive Maintenance Plan
After proper valve installation, the next step is creating a preventive maintenance (PM) plan and understanding how to troubleshoot your valves when problems occur.
Each PM schedule will be specific to the needs of your system because no two industrial fluid systems are identical. System pressures and temperatures must be considered when determining how often you will need to maintain or replace valves. In addition, it helps to know how corrosive the process fluid is and how many on/off cycles your valve will have over a given period. Reputable valve suppliers should be able to provide you with relevant PM information and offer advice on constructing your plan.
 Figure 3. If leaks do not present themselves to your eyes and/or nose, it may be necessary to use ultrasonic testing to determine if there is a leak or if the valve has been properly installed.Swagelok
Creating a proper PM schedule will help ensure your valves are working as they should. Frequently, the first sign that something is wrong is a leak, which can often be detected with your own senses. For example, a chemical leak may produce an odor before your eyes can locate its specific location. Leaks can also be identified with ultrasonic equipment (Figure 3) or liquid leak detectors (Figure 4) if they are not obvious to the naked eye or do not produce an odor. It is crucial to catch valve leaks early to keep more serious problems from developing.
To discover these leaks as quickly as possible, you can follow these troubleshooting techniques and decide how to remediate them before they get worse:
Test the valve. Determine whether the valve is functioning properly and decide where the leak is occurring. There are two main forms of valve leakage:
- A seat leak, where the leak is contained inside the valve, but fluid passes through the seal and the valve is unable to stop the flow.
- A shell leak, where fluid leaks outside of the valve into the atmosphere, often through the stem or body of the valve.
Inspect the valve. Look closely at the seats, O-rings, and stem tips to see if there is any obvious wear or damage.
Repair the valve. Some internal components like seats, packing, and stems may be replaceable. Doing this may save money over replacing the entire valve. On occasion, all the internal components may need to be replaced at once (Figure 5). Your valve supplier should be able to provide seal kits to make such repairs.
 Figure 4. Another method to find leaks is to perform a bubble test, which helps determine if a fitting connection should be tightened or replaced.Swagelok
Maintain the valve. As you learn the cadence of your valve wear, you should adjust your PM schedule accordingly. Tags are helpful in these situations because they provide technicians with quick, easy visual indicators of what each valve does and how frequently they need inspection.
When Replacing the Valve Is the Only Option
When the damage to the valve is extensive, it may not be reparable. In those instances, the entire valve should be replaced to ensure seamless system operation. Some examples of irreparable damage include:
- Heavy corrosion that deteriorates the valve body, compromising its pressure-retaining capabilities and creating a safety risk
- Major contamination that cannot be cleaned
- Overtightening a valve at its end connections and causing damage, rendering it unusable for reinstallation.
 Figure 5. Sometimes it may be necessary to replace all the internal components in a utility valve to keep it in proper working order.
Reliable Operation Results from Proper Training
It is not a luxury to have reliable valve operation in your fluid systems: It is a critical piece of the puzzle, ensuring the overall health and safety of the systems while in operation. Having a more granular understanding of proper valve installation, common troubleshooting techniques, and implementing a comprehensive PM plan can lead to a safer, more efficient, and more profitable operation.
An original version of this article appeared on the Swagelok Reference Point blog here: www.swagelok.com/en/blog/valve-maintenance-and-troubleshooting.
About the AuthorSam McCulloch is Associate Product Manager for Swagelok Company.